
How to Onboard a Client to Their Own Lead Portal in 15 Minutes
A step-by-step workflow for agencies: capture a client's form leads, scope them to their own view, and hand over a password-free portal in about 15 minutes - no WordPress account required.
In This Guide
- Onboard a client to their leads in about 15 minutes
- How fast should a client be able to see their leads?
- Step 1: Capture the client's form submissions reliably
- Step 2: Scope each client to only their own leads
- Step 3: Give the client a password-free way in
- Step 4: Orient the client on the inbox and pipeline
- Step 5: Set response targets and who does what
- What is the pre-handoff checklist before you send the link?
- What should you avoid when onboarding a client?
- Get your first client live, then make it standard
- Frequently Asked Questions
Onboard a client to their leads in about 15 minutes
You can onboard a new client to their own lead portal in about 15 minutes, without ever creating a WordPress account for them. That speed matters: a 2024 test of 1,000 B2B companies found 63.5% never responded to a demo request at all (RevenueHero, 2024). Fast, direct access stops leads from dying in a shared inbox.
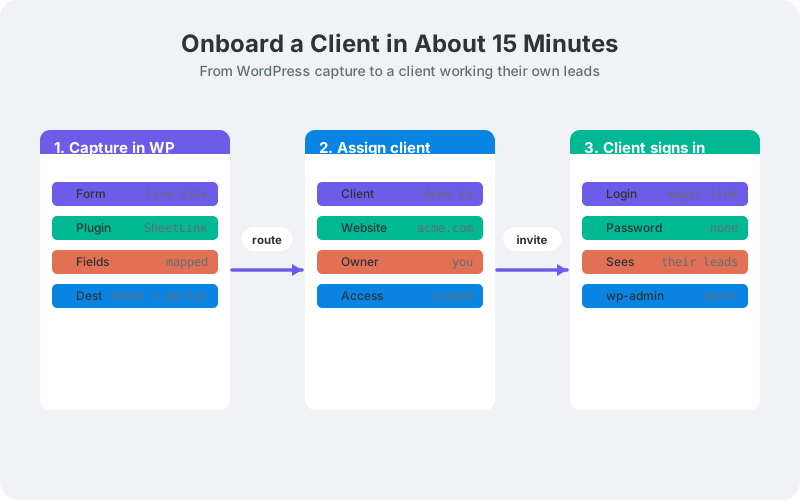
This guide walks the real workflow an agency uses: capture the client's form submissions, scope their leads so they only see their own, hand them a password-free way in, orient them on the inbox and pipeline, and set clear response expectations. Every step is something you can finish today. No developer, no wp-admin seat, no training call that eats an afternoon.
Work through it once and you have a repeatable onboarding you can run for every client. Here is the step by step.
How fast should a client be able to see their leads?
A client should see a new lead within minutes of submission, not the next morning. Speed decides the outcome: the odds of contacting a web lead drop 100x, and of qualifying it 21x, when the first call slips from 5 to 30 minutes after arrival (InsideSales.com / MIT Lead Response Management Study, 2007).
When you sit between the client and their leads, forwarding emails or exporting spreadsheets on Fridays, you become the bottleneck. The client waits on you, the lead waits on the client, and the window closes. Direct access removes you from the critical path.
That is the whole point of onboarding a client to their own portal. They get the lead the moment it lands, act on it while intent is still hot, and you keep proof of how fast each response was. For a deeper look at setting a target, see our guide on tracking lead response time.
Step 1: Capture the client's form submissions reliably
Start by capturing every submission from the client site into one structured place. Since WordPress powers 41.2% of all websites (W3Techs, 2026), the client almost certainly runs a form plugin you can wire up in minutes. Map the fields that matter, then pick a destination.
The free SheetLink Forms plugin sends WordPress form submissions straight to a Google Sheet in real time, using one-click Google connect or a classic Apps Script receiver deployed in the client's own Google account. There is no Zapier subscription, no per-task fee, and no third-party processor sitting on the lead data. It supports 12 major form plugins, so whatever the client already uses is likely covered.
During setup, choose the sheet and submit one test entry: the header row is seeded from the form's own fields - name, email, phone, message - plus the source and campaign metadata that gets appended automatically. For the exact clicks, follow our walkthrough on connecting WordPress forms to Google Sheets without Zapier.
Get capture right first. Everything downstream depends on clean, complete rows landing reliably.
Step 2: Scope each client to only their own leads
Scope each client to only their own leads so no one ever sees another client's data. In practice, every client site writes to its own sheet or its own tab, and the portal reads only that slice. One client, one view - that boundary is non-negotiable when you run multiple accounts.
You can separate clients by a whole sheet per client, or a tab per client inside one workbook. Either keeps the data walled off. If you manage many sites, keep the capture layer consistent: same field names, same column order, same metadata on every client. That uniformity is what lets you scale onboarding without rebuilding the mapping each time. Our agency playbook for syncing form data across 25 client sites covers the naming conventions that make this painless.
Conditional routing can split submissions by field value, for example sending one client's contact form to their sheet and a second brand's form somewhere else. Get scoping right and the client sees a clean, private inbox with zero leakage.
Step 3: Give the client a password-free way in
Give the client a password-free way in: a magic link. Instead of a username and password, or worse a WordPress login, the client clicks a link sent to their email and lands directly in their lead inbox. No account to provision, no password reset tickets, no wp-admin access to lock down.
This is where a client-facing portal earns its keep. The coming-soon LeadOps portal gives each client a branded sign-in that shows only their leads, with magic-link access and no WordPress account at all. You can read more on the approach in giving clients their leads without WordPress access, and see the portal itself on the LeadOps page.
Send the link, confirm the client can open it on their phone, and you have cleared the hardest part of onboarding. Access should take seconds, not a support call.
Step 4: Orient the client on the inbox and pipeline
Spend two minutes orienting the client on the two things they will use daily: the inbox and the pipeline. The inbox is the running list of new leads with contact details, source, and timestamp. The pipeline is how they move each lead from New to Contacted to Qualified to Won or Lost.
Keep the orientation short. Show them where a new lead appears, how to open it, how to add a note, and how to change its status. Most clients grasp a simple four-stage pipeline instantly because it mirrors how they already think about deals. Full attribution, source, campaign, UTM, and click IDs, sits on each lead so they know where it came from.
Decide together what belongs on the default view before you hand it over. Our guide on what belongs in a client lead dashboard is a useful checklist. A focused view beats a cluttered one every time.
Step 5: Set response targets and who does what
Set a clear response target and spell out who does what before you step back. A common agency standard is a first response within a set number of minutes during business hours. Write it down, agree on it, and make the portal track it so the number is visible to both sides.
Roles should be equally explicit. Typically the agency owns lead generation and delivery, keeping the forms working and the leads flowing, while the client owns the response and qualification. Put that split in writing so nobody assumes the other side is calling the new lead.
A portal that stamps every lead with an arrival time and a first-response time makes accountability automatic. If a lead sat for two hours, both sides can see it. That shared visibility prevents the 'I thought you had it' gap that quietly kills deals. Revisit the target after the first month with real numbers in hand, and adjust if the client's team cannot hit it.
What is the pre-handoff checklist before you send the link?
Run this quick pre-handoff checklist before you send the client their link. It should take a couple of minutes and catches the mistakes that turn into support tickets later.
- Submit a real test lead through the client's live form and confirm it appears in the destination.
- Check that every mapped field lands in the right column, including source and campaign metadata.
- Confirm the client's view shows only their leads and nothing from other accounts.
- Open the magic link yourself on a phone to verify access works outside your office network.
- Confirm the response target and the New-to-Won pipeline stages are set.
- Agree in writing who responds to leads and how fast.
Work the list top to bottom. If any item fails, fix it before the client ever logs in - a broken first impression is expensive. For a delivery safety net, an automatic retry queue re-sends failed submissions on its own, so a momentary outage never loses a lead.
What should you avoid when onboarding a client?
Avoid three onboarding mistakes that undo all the speed you just built. First, do not hand the client a raw shared spreadsheet and call it a portal - a spreadsheet has no response tracking, no access control, and no clean per-client boundary. Second, never give a client a WordPress login just to see leads.
A WordPress account means plugin access, update prompts, and a security surface you now have to manage for every client. A read-only, client-facing portal sidesteps all of it. The difference between the two approaches is covered in client lead portal vs shared Google Sheet.
Third, do not skip the test lead. Handing over a portal you never verified end to end is how clients find the broken field mapping before you do. Slow down for five minutes here and save yourself a week of cleanup, and a client who wonders why their first lead never showed up.
Get your first client live, then make it standard
Onboarding a client to their own lead portal comes down to five moves: capture reliably, scope to their leads only, hand them a magic link, orient them on the inbox and pipeline, and agree on response targets. Done in order, it is a 15-minute job you can repeat for every client.
Start with capture today using the free SheetLink Forms plugin, then layer the client-facing portal on top. When you are ready to give clients their own branded, password-free view, the coming-soon LeadOps portal is built for exactly this, and the agency overview shows how it fits a multi-client workflow. The clients who see their leads first, and act on them fastest, are the ones who stay. Get the first client live, then make it your standard.
Frequently Asked Questions
Do I need to give my client a WordPress account to see their leads?
No. A client never needs a WordPress account to view their leads. A client-facing lead portal uses a magic-link sign-in tied to their email, so they see only their own submissions with no wp-admin access, no plugin exposure, and no login for you to secure. That separation is safer for everyone.
How long does it take to onboard a client to a lead portal?
About 15 minutes once your capture is set up. Wiring the form to a destination takes a few minutes, scoping and access take a few more, and orientation is a two-minute walkthrough. The one-time work is standardizing your field names so every new client follows the same repeatable pattern.
What is a magic link and is it secure?
A magic link is a one-time sign-in URL sent to the client's email, so there is no password to create or reset. It is secure because access is tied to control of the email inbox and links expire. For clients who only check leads occasionally, it removes the biggest friction point.
Can I keep each client from seeing other clients' leads?
Yes, and you must. Each client site writes to its own sheet or tab, and the portal shows only that client's slice of data. Consistent field names and column order across sites keep the separation clean as you add accounts. One client, one private view, with zero cross-account leakage.
What should the client actually do in the portal?
The client works two things: the inbox and the pipeline. They open each new lead, respond fast, add a note, and move it from New to Contacted to Qualified to Won or Lost. Everything else, attribution, source, and reporting, updates automatically, so their daily job stays simple.
Who is responsible for responding to leads, the agency or the client?
Usually the client responds to leads while the agency keeps them flowing. Write the split down during onboarding so nobody assumes the other side is calling. Because speed is decisive, agree on a first-response target during setup and let the portal track it against every lead automatically.
Do I need Zapier or code to capture the client's form submissions?
No. The free SheetLink Forms plugin sends WordPress form submissions to Google Sheets directly, with no Zapier subscription and no code. Connect with one-click Google connect or a classic Apps Script receiver in the client's own Google account; either way there are no per-task fees and no third-party processor holding the lead data.
Can I do this for many clients without rebuilding it each time?
Yes. Standardize once, then repeat. Use the same form field names, column order, and metadata on every client site so your capture and portal setup stay identical. That consistency is what turns onboarding into a 15-minute checklist instead of a custom project for each new account you take on.
More Lead Management guides
Capture Every Client Lead in Real Time, Free
Send WordPress form submissions straight to Google Sheets with no Zapier and no monthly fees, then hand clients their own view.